Smooth Bokeh Backgrounds in Colour Pencil
UK Colour Pencil Society Technique Taster video on one way to achieve a smooth, blurred bokeh background in colour pencil.

Happy New Year to all our members! I hope that you all had a good holiday period and wish you the very best healthy, happy and creative year ahead.
For the first challenge of 2025, we are going to have a little look at one way to achieve a soft, out of focus bokeh background in colour pencil.
Some artists choose to use other media: soft pastel, pan pastel, wax or oil pastel, watercolour… all can be speedy and effective. But colour pencils can also be used of course, and that is exactly what we aim to do here.
Adding backgrounds to colour pencil pieces presents a tremendous challenge, one that seems to grow exponentially once embarked upon! What starts out as a blank page full of promise and the chance to realise dreams can quickly sour and become the stuff of nightmares. But fear not, because with a little technical knowledge, we can tame our blurred backgrounds and give our subjects the separation they deserve!
The key to achieving a blurred background is to use a method that helps you achieve soft, gradual blends. One method that can work well is using Odourless Mineral Spirits (OMS), of which there are a number on the market that are suitable for colour pencil artwork. It is a solvent, so great care needs to be taken when using it. Ensure that lids are swiftly replaced after use, and use in a well-ventilated area, keeping it away from pets and children. I tend to use a mask when applying it, as otherwise it gives me a headache, and I know that some are unable to use it at all. In those cases, watercolour pencils can be an alternative or blending with heat.
Rather than applying dry pencil to paper, layering, then adding OMS and blending, I have opted for a slightly different approach. I have instead applied colour pencil to a palette (a scrap of paper or drafting film also works), then added OMS with a paper stump to create a paint-like mix which is then applied to the paper directly and colour built up. Extra colour build up can be achieved by applying dry pencil gently over damp OMS applied areas, and again where needed to touch up and smooth it all out once it is all dry. Adding bokeh circles can be done in this way too.
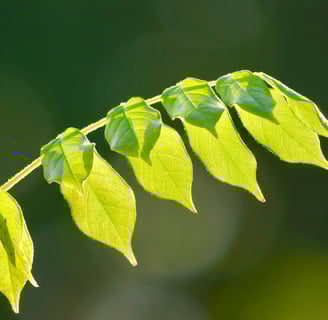
For this quick test piece, I chose one of my photos that features a green, blurred background and due to time constraints will feature just the background in the accompanying Technique Taster video. Feel free to continue on and complete the leaves of course, or even to apply the techniques to your own choice of reference. Do ask any questions if needed, and post away any beautiful backgrounds that you create on Facebook, the UKCPS forum, or other social media as it would be lovely to see!
YouTube Video
UK Colour Pencil Society, Smooth Bokeh Backgrounds in Colour Pencil
Materials Use
Graphite transfer sheet, home made or purchased
Strathmore Series 300 Bristol Vellum
Derwent Lightfast pencils: Basil, Forest, Foliage, Merlot, Grass Green 70%, Banana, Light Aqua (if doing leaves)
Derwent Procolour: Chinese White (or equivalent)
OMS – Gamsol or similar, mine is Pebeo from the Range
Paper blending stumps (tortillons)
Slice tool, or equivalent craft knife (optional)
Derwent Blender Pen (optional)
Derwent USB rechargeable eraser (optional), or equivalent
Blu Tak (white), or equivalent
Something to use as a mixing palette, I use a Caran d’Ache plexiglass artist palette; just a scrap piece of Bristol vellum, or pastelmat is fine otherwise